
Windows Defender, now known as Microsoft Defender Antivirus, is the built-in security solution on Windows devices. It provides real-time protection against malware, spyware, viruses, and other malicious threats.
While it is an essential tool for most users, there are times when it can be overly aggressive and mistakenly remove files that you actually need.
This situation can be frustrating, especially if the file is crucial for work, gaming, or development. We will also cover safe practices and step-by-step methods to configure Defender without compromising security.
In this TazaJunction.com comprehensive guide, we’ll explore how to prevent Windows Defender from removing files while still keeping your system protected.
Table of Contents
Why Does Windows Defender Remove Files?
Before learning how to prevent Windows Defender from removing files, it’s important to understand why it happens in the first place. Microsoft Defender uses advanced scanning algorithms to detect suspicious activity. However, certain files such as:
- Game mods or cracked applications
- Development scripts or code libraries
- Old software patches
- Compressed files with executables
…might trigger false positives. Defender marks these files as harmful and deletes them automatically to protect your system. While this is a safety measure, it sometimes creates inconvenience.
How to Prevent Windows Defender From Removing Files?
Method 1: Exclude Files and Folders
The most effective way to stop Defender from deleting your important files is by creating exclusions. Here’s how to prevent Windows Defender from removing files using the exclusion feature:
- Open Windows Security from the Start menu.
- Click on Virus & threat protection.
- Scroll down and select Manage settings under Virus & threat protection settings.
- Locate Exclusions and click Add or remove exclusions.
- Add your specific file, folder, file type, or even an entire process.
This way, Defender will skip scanning and deleting the excluded files. Use this method carefully, as adding malicious files can compromise security.
Method 2: Restore Files from Quarantine
Sometimes, Defender doesn’t delete files permanently but moves them to quarantine. If that happens, you can restore them manually.
Steps to follow:
- Open Windows Security.
- Go to Virus & threat protection history.
- Check the Quarantined items list.
- Select the file and click Restore.
By doing this, you regain access to the file. However, make sure it is truly safe before restoring. This is another practical step in how to prevent Windows Defender from removing files permanently.
Method 3: Disable Real-Time Protection Temporarily
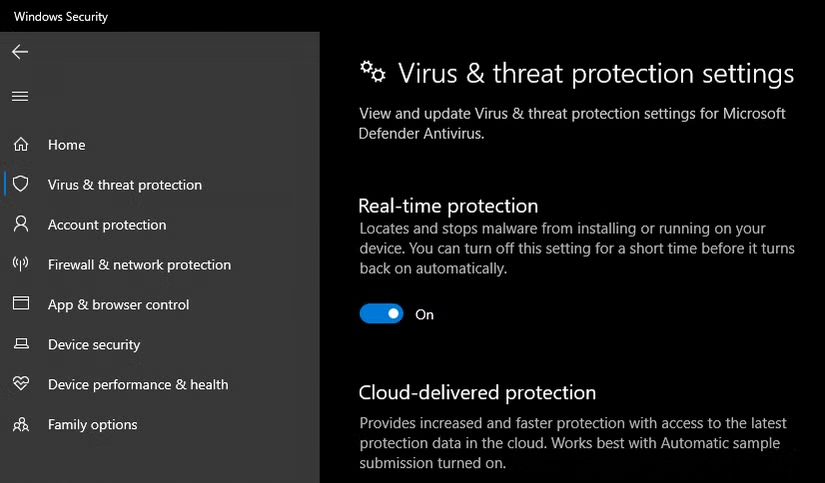
For advanced users, you might want to install or use a file that Defender keeps flagging. In such cases, you can disable real-time protection temporarily.
Steps:
- Go to Windows Security > Virus & threat protection.
- Click Manage settings.
- Toggle Real-time protection off.
This prevents Defender from scanning files during the time it is disabled. Once you are done, turn it back on to stay safe. Remember, this method should be used sparingly when figuring out how to prevent Windows Defender from removing files.
Method 4: Use Controlled Folder Access
Controlled Folder Access is a feature that restricts changes to important folders by unknown applications. By customizing these settings, you can decide what apps have access to specific files.
- Open Windows Security.
- Go to Ransomware protection.
- Enable Controlled folder access.
- Add allowed apps that you trust.
This allows you to protect essential files without disabling Defender entirely. For many users, this is one of the safest ways in how to prevent Windows Defender from removing files unnecessarily.
Method 5: Use Group Policy Editor (Advanced Users)
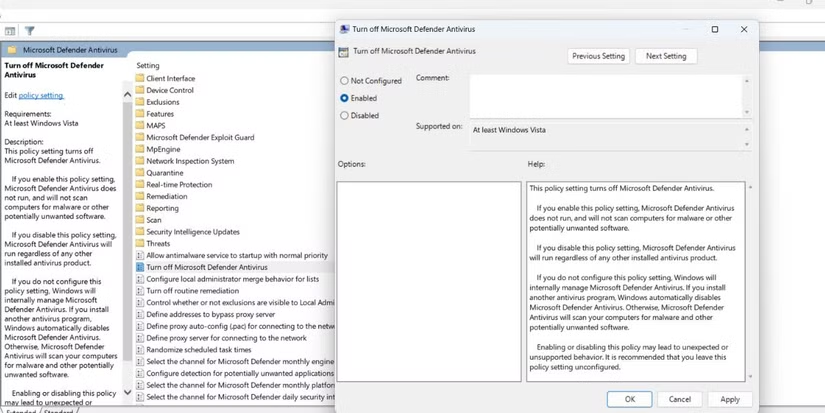
If you’re using Windows Pro or Enterprise editions, you can configure Microsoft Defender using Group Policy. This is a more advanced option for those who want complete control.
Steps:
- Press Win + R, type
gpedit.msc, and hit Enter. - Navigate to Computer Configuration > Administrative Templates > Windows Components > Microsoft Defender Antivirus.
- Configure policies like Turn off Microsoft Defender Antivirus or Configure Detection Options.
While this gives you full customization, be careful with settings as they can weaken your overall protection. This is an advanced way of managing how to prevent Windows Defender from removing files.
Method 6: Use Command Prompt or PowerShell
For users who are comfortable with commands, PowerShell offers flexibility. You can add exclusions or disable specific features directly with commands.
Example command to add an exclusion:
Add-MpPreference -ExclusionPath "C:\YourFolder"
This adds a folder exclusion so Defender will not scan or remove files in that directory. Such commands are another option in how to prevent Windows Defender from removing files.
Safe Practices When Preventing Defender from Removing Files
While it’s useful to know how to prevent Windows Defender from removing files, you must ensure you’re not exposing your system to real threats. Keep these practices in mind:
- Only exclude files or folders you fully trust.
- Avoid disabling real-time protection for long periods.
- Always scan downloaded files with an external trusted antivirus.
- Keep Windows updated for the latest security patches.
- If you’re unsure about a file, upload it to a virus scanning service before excluding it.
Alternatives to Windows Defender
Some users prefer third-party antivirus software for better control. Options like Avast, Bitdefender, or Kaspersky allow users to whitelist files more easily. However, for most Windows users, Defender is sufficient once properly configured.
Understanding how to prevent Windows Defender from removing files helps you make the best of both worlds—strong protection without unnecessary deletions.
Conclusion
Windows Defender plays a crucial role in keeping your system secure, but its aggressive file deletion can sometimes interfere with your workflow.
By learning how to prevent Windows Defender from removing files, you can take control of your system’s security settings while keeping important data safe.
Whether you’re restoring files from quarantine, adding exclusions, disabling real-time protection temporarily, or using advanced tools like Group Policy and PowerShell, these methods ensure you don’t lose access to essential files.
Remember, the ultimate goal is balance: protect your computer without blocking your productivity. By following this guide on how to prevent Windows Defender from removing files, you’ll gain that control and peace of mind.